
Example: affection and multiple endings
A saved variable records affection, choices change it, a Blueprint Value shows it on the dialogue box, the story ends according to it, and the title page shows how many endings have been reached.
This example builds an affection system in a project created from the Skeleton template:
- Choices increase the saved variable
Affection. - The right side of the dialogue box shows the current value of
Affection. - An extra branch plays when
Affectionis 20 or more. - The story ends in one of three endings, according to
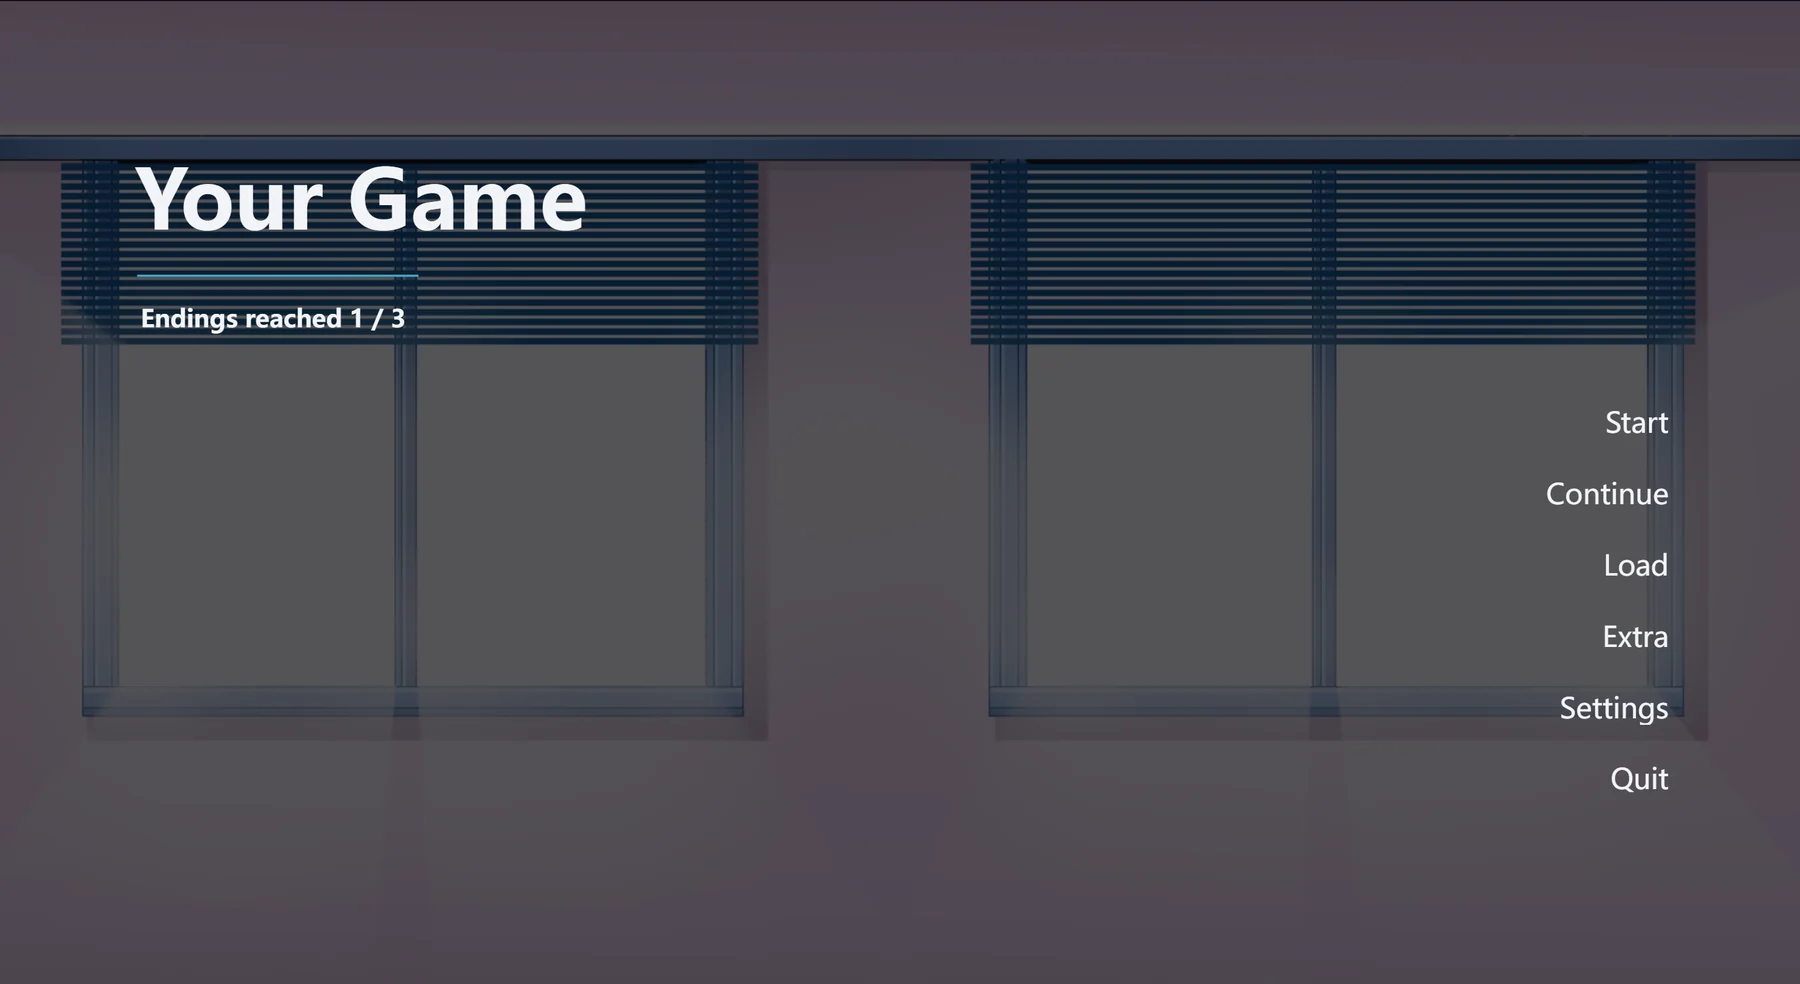
AffectionandHonest. - The title page shows how many endings have been reached.
| Part | Where | Purpose |
|---|---|---|
Saved variable Affection | Variables panel | Holds affection; saved and loaded with the game |
/inc, /if, /ending | Scenes | Increase affection, branch on it, mark the endings |
| Blueprint Value | A text in the Game UI Dialogue | Reads Affection and shows it |
Get Endings | A text on the page Title | Shows the number of endings reached |
| Ending | Condition |
|---|---|
| Festival together | Affection is 35 or more, and "Something honest." was chosen in the clubroom |
| Same time tomorrow | Affection is 20 or more |
| Left the club | Any other case |
Before you start
Create a project from the Skeleton template, as described in Getting started. The Skeleton contains three scenes: The corridor, The clubroom and Last light. The menu in The clubroom writes the choice into the saved variable Honest; Last light shows a different line depending on Honest and ends with the ending Same time tomorrow.
The steps below declare the variable, change the three scenes in turn, and then change the Game UI Dialogue and the page Title.
1. Declare the variable
Open Variables in the right sidebar and click Add next to Saved variables. Name the new variable Affection, set its type to Number and leave the default at 0.
A saved variable belongs to the whole project, and every scene and blueprint can read and write it. Its value is written into the save, restored when the save is loaded, and reset to the default when a new game starts. The other scopes are described in Variables.
2. Change affection in choices
The corridor
After Narra's line "One and a half. You keep leaving before it gets dark.", add a row, type /menu and press Enter twice. Studio inserts a menu with its first option. Click Add option on the menu row to add a second option, double-click each option to enter its text, then click Add action inside on an option to enter the rows that run when it is chosen:
| Option | Rows inside the option |
|---|---|
| I'll stay until the end today. | Narra: "Then we'll lock up together today."/inc Affection 10 |
| I have something else today. | Narra: "All right." |
The clubroom
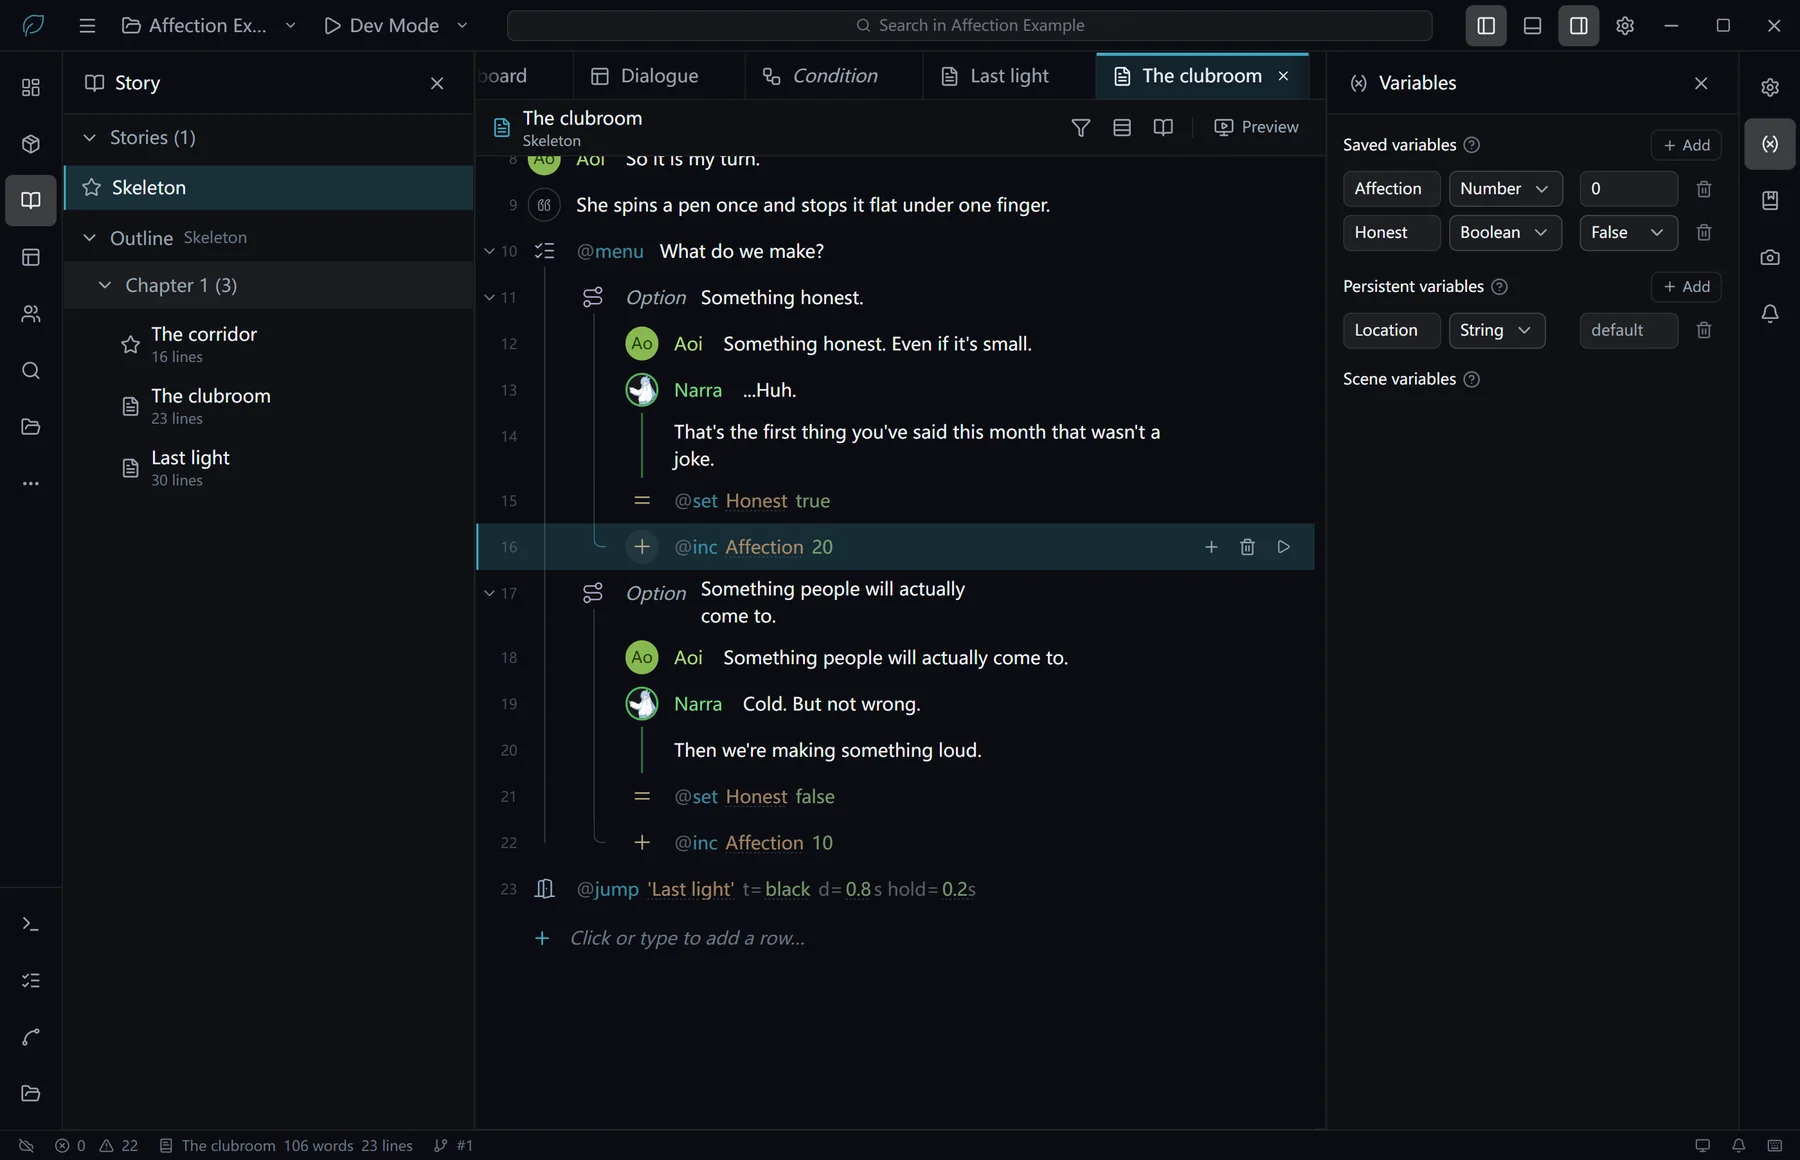
Each of the two options in the menu What do we make? contains a /set Honest … row. After each of those rows, add:
| Option | Row to add |
|---|---|
| Something honest. | /inc Affection 20 |
| Something people will actually come to. | /inc Affection 10 |
After you type /inc Affection 20 and press Enter, the row reads inc Affection 20. Without a number, /inc adds 1; /dec decreases a value; /set Affection Affection + 20 has the same effect as /inc Affection 20.
3. Show affection on the dialogue box
Add a text
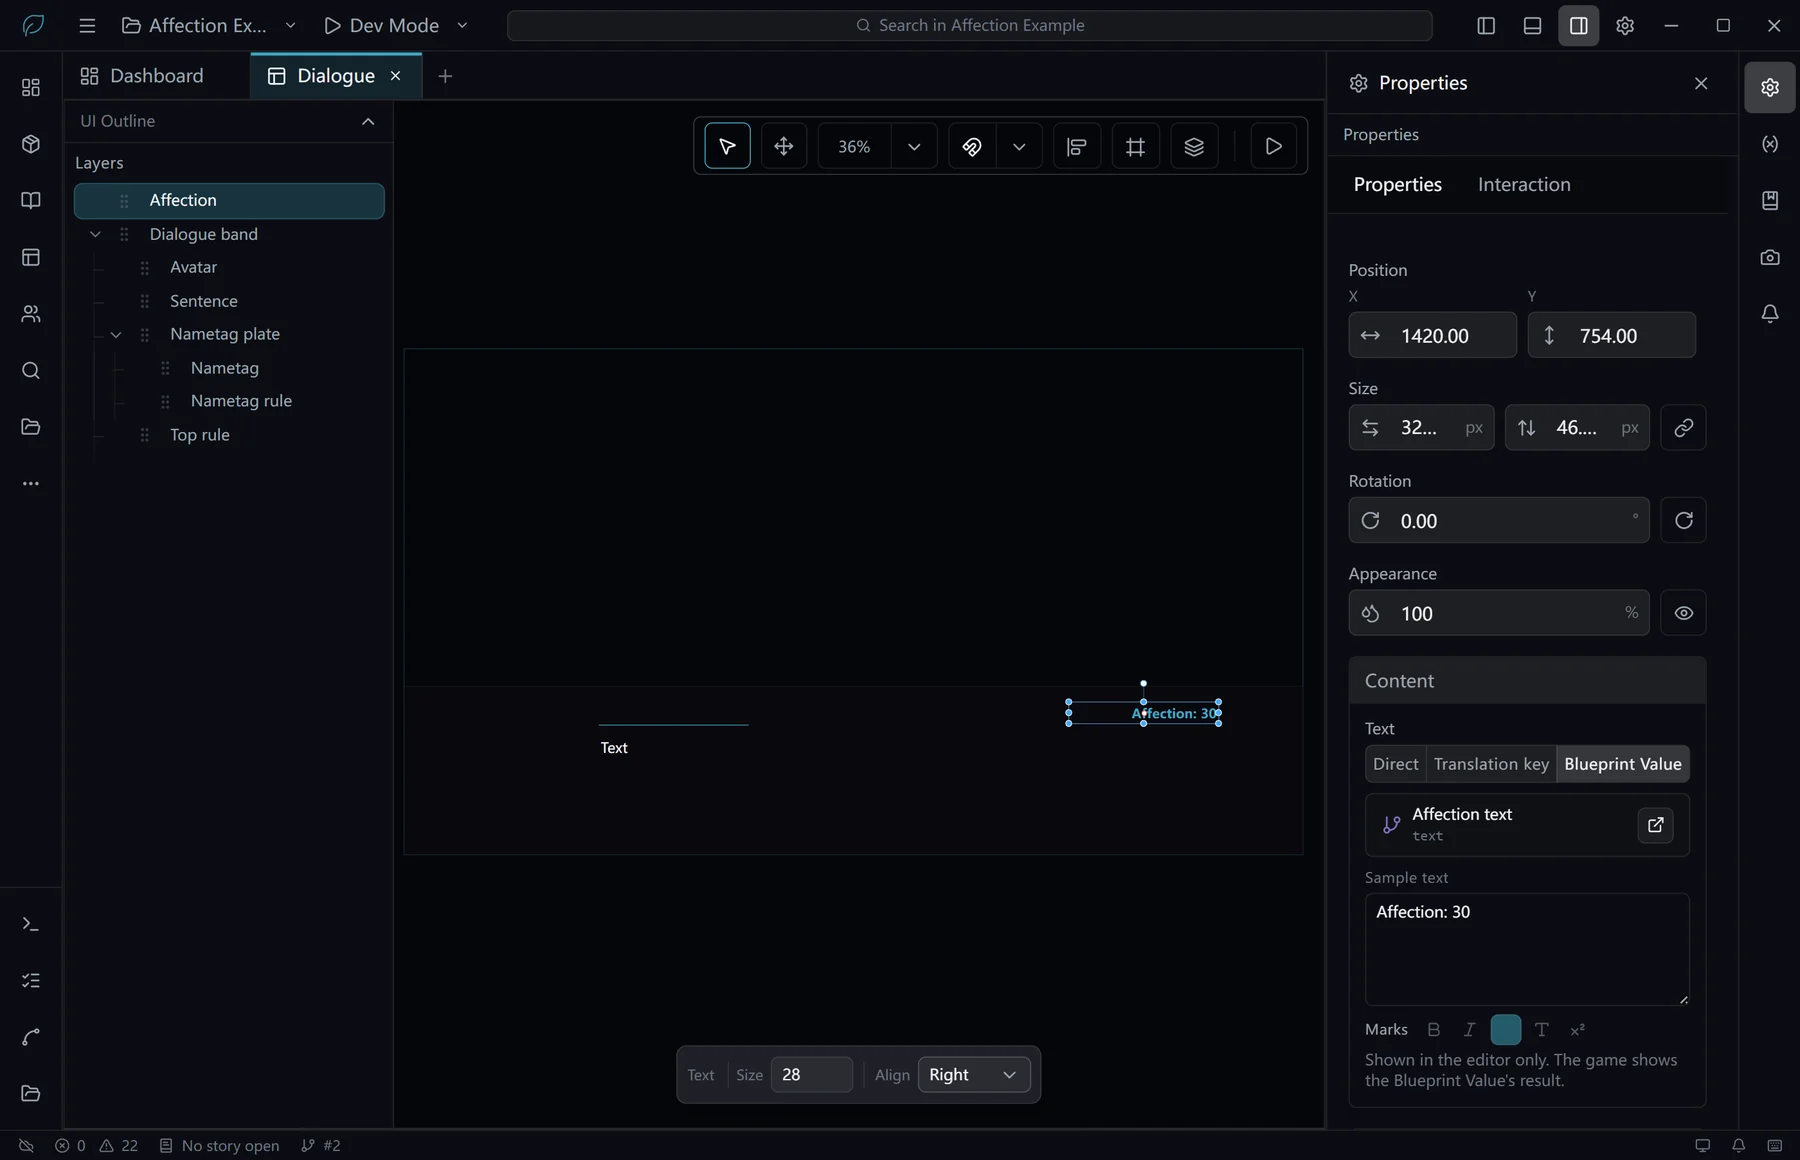
Choose UI in the activity bar on the left, choose Game UI under Interfaces, and open Dialogue. Drag a Text from the toolbar below the canvas to the right side of the dialogue band, name it Affection, and align its text to the right. The space to the right of the nametag is at X 1420, Y 754, with a size of 320 × 46.
Use a Blueprint Value for the text
Select the text and, under Content in the properties panel, switch Text from Direct to Blueprint Value. Studio creates a Blueprint Value for it, and the existing text becomes the Sample text, which only the editor shows. Click Open Blueprint Value.
Build the graph
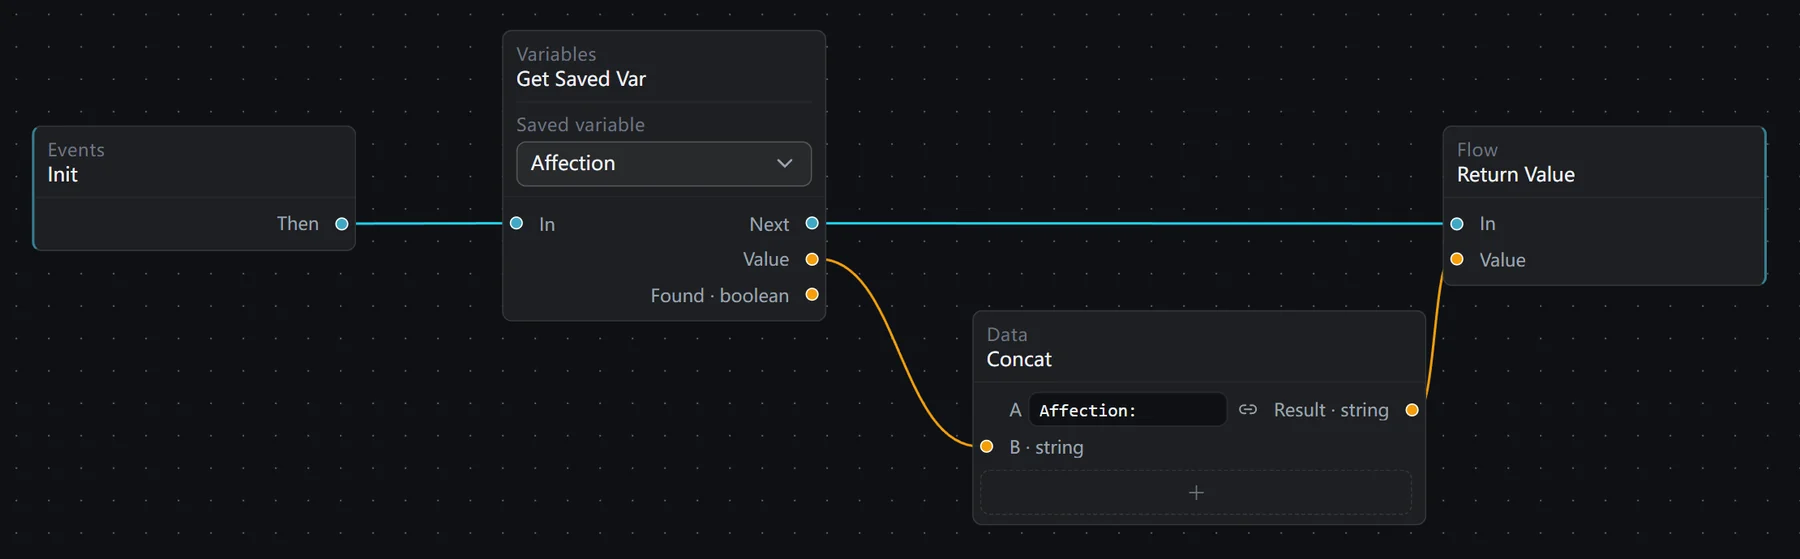
The Blueprint Value already contains Init connected to Return Value, with a String supplying the existing text. Delete the String, then add and connect the nodes below:
| Node | Setting | Connects to |
|---|---|---|
Init | Exec to Get Saved Var | |
Get Saved Var | Saved variable: Affection | Exec to Return Value; Value to B of Concat |
Concat | A: Affection: (ending with a space) | Result to Value of Return Value |
The text is evaluated again each time the saved variable it reads is written. The value on the dialogue box updates when /inc runs, when a save is loaded and when a new game starts.
4. Branch on affection
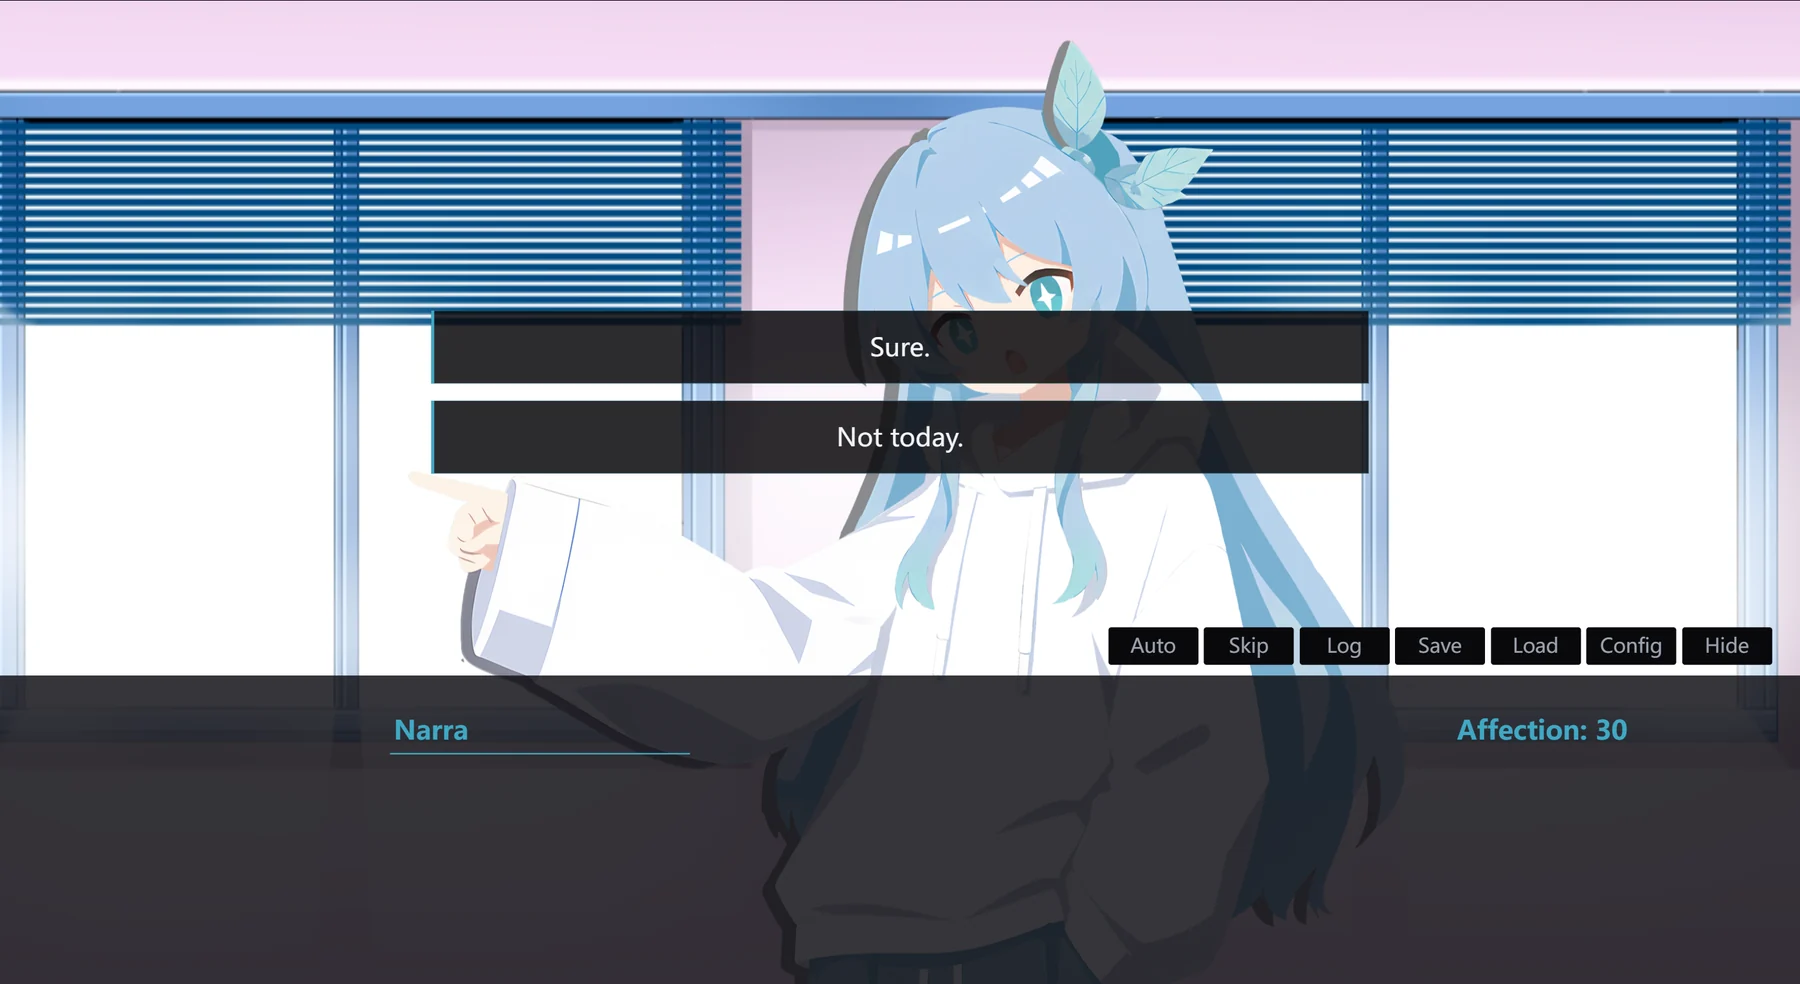
In Last light, add a row after the condition on Honest and before Narra's line "Same time tomorrow. Don't be late.", type /if Affection >= 20 and press Enter. Under If, add:
- Narra: "Do you want to walk to the station together?"
- A menu. The option "Sure." contains Narra: "Okay." and
/inc Affection 15; the option "Not today." contains Narra: "Maybe next time."
When Affection is below 20, the whole branch is skipped. This condition has no Else branch, so the story continues with the next row.
The condition of an /if is an expression, which supports comparisons and &&, || and !. The condition can also be switched to Variable in the properties panel, where the variable and the comparison are chosen from dropdowns.
5. Three endings
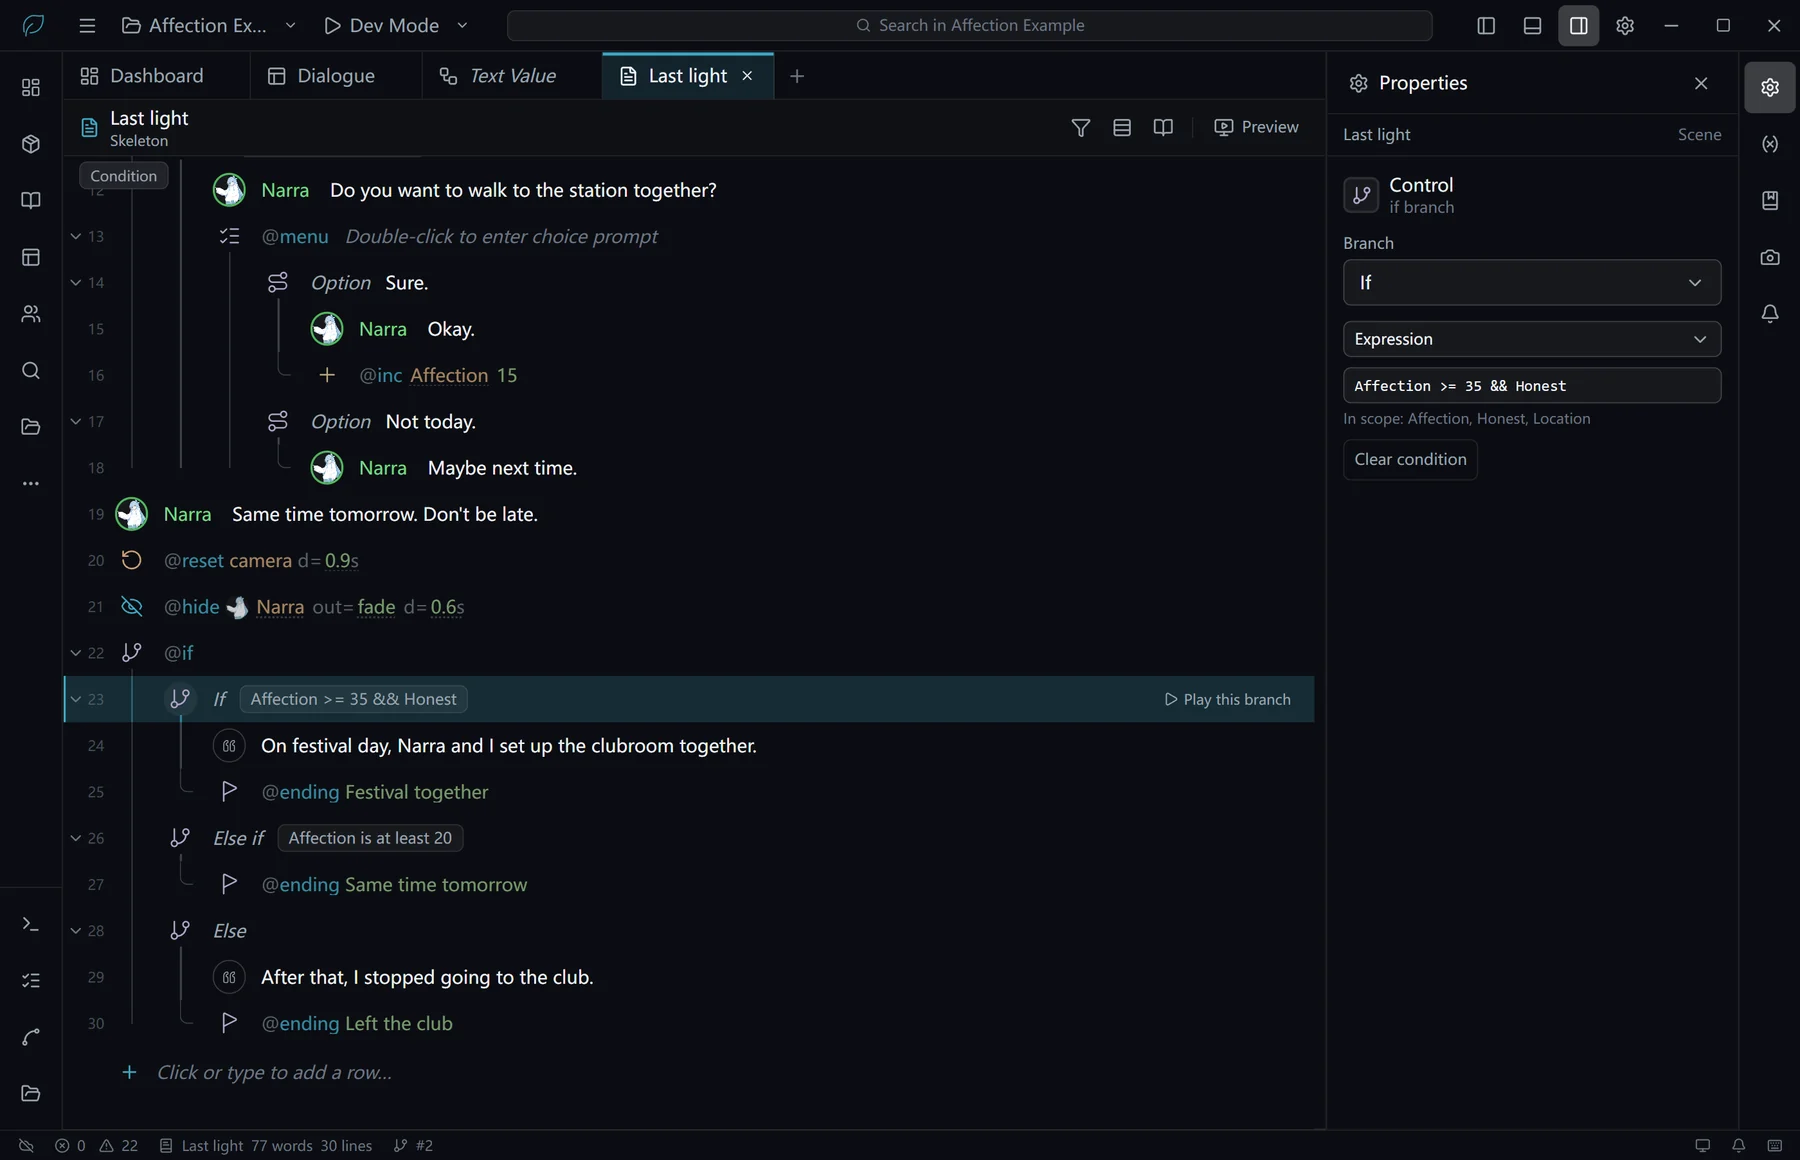
Delete the two lines of narration and the ending Same time tomorrow at the end of Last light. At the end of the scene, type /if Affection >= 35 && Honest and press Enter, then click Else if and Else on the condition row to add the other two branches:
| Branch | Condition | Rows in the branch |
|---|---|---|
| If | Affection >= 35 && Honest | Narration "On festival day, Narra and I set up the clubroom together."/ending Festival together |
| Else if | Affection >= 20 | /ending Same time tomorrow |
| Else | Narration "After that, I stopped going to the club."/ending Left the club |
/ending ends the story on that row and records which ending the player reached.
6. Return to the title page after an ending
Open Project → App, expand main under Build variants, and set Page shown when the story ends to Title. The story shows this page after it ends on an ending row. A single ending row can show a different page, set under Page shown afterwards in the properties panel.
7. Show the endings reached on the title page
The endings a player has reached are recorded outside the save. Loading a save, starting a new game and restarting the game do not clear the record.
Open the page Title, add a Text below the title rule and name it Endings. Switch its Text to Blueprint Value and open it.
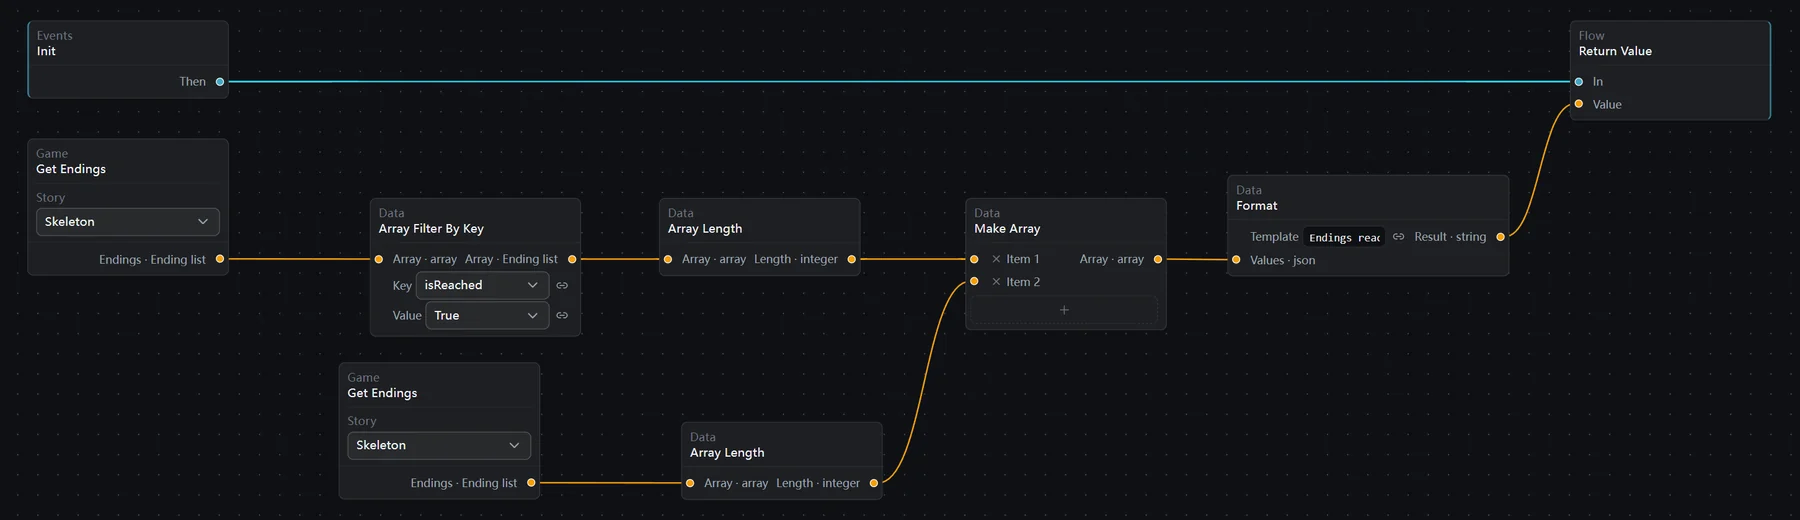
Add Get Endings and set Story to Skeleton. Its Endings output carries an Ending list. Drag a wire from Endings and release it on empty canvas: the add-node menu opens on Fields, which lists what can be done with each field of an ending. Choose Filter by isReached. Studio adds Array Filter By Key with Key set to isReached and Value set to True, and connects Endings to its Array.
Add the other nodes and connect them as below:
| Node | Setting | Connects to |
|---|---|---|
Init | Exec to Return Value | |
Get Endings | Story: Skeleton | Endings to Array of Array Filter By Key |
Array Filter By Key | Key: isReached, Value: True | Array to Array Length |
Array Length | Length to Item 1 of Make Array | |
Get Endings | Story: Skeleton | Endings to the second Array Length |
Array Length | Length to Item 2 of Make Array | |
Make Array | Two items | Array to Values of Format |
Format | Template: Endings reached {0} / {1} | Result to Value of Return Value |
Get Endings lists every ending row in the story. Each ending has the field isReached, which states whether the player has reached it. The first Get Endings keeps the endings that have been reached; the second counts all of them. A second wire from the same Endings output would replace the first, so each count has its own Get Endings. The fields of an ending and the other nodes that read them are listed under Structs.
The template is text written in the graph and does not change with the game's language. In a project with more than one language, supply the template with Translation Key Text.
Testing
- Press F5 to run the project in Dev Mode. Click Play from this row on a row to start from that row.
- The debug button at the bottom left of Dev Mode → Story → Variables lists the current values of the saved variables, which can be changed there. Set
Affectionto 40, turn onHonest, and play to the end to check the ending Festival together. - The arrow next to the Dev Mode button → Reset player data → Dev Mode clears all saves and the endings record of Dev Mode. The title page returns to
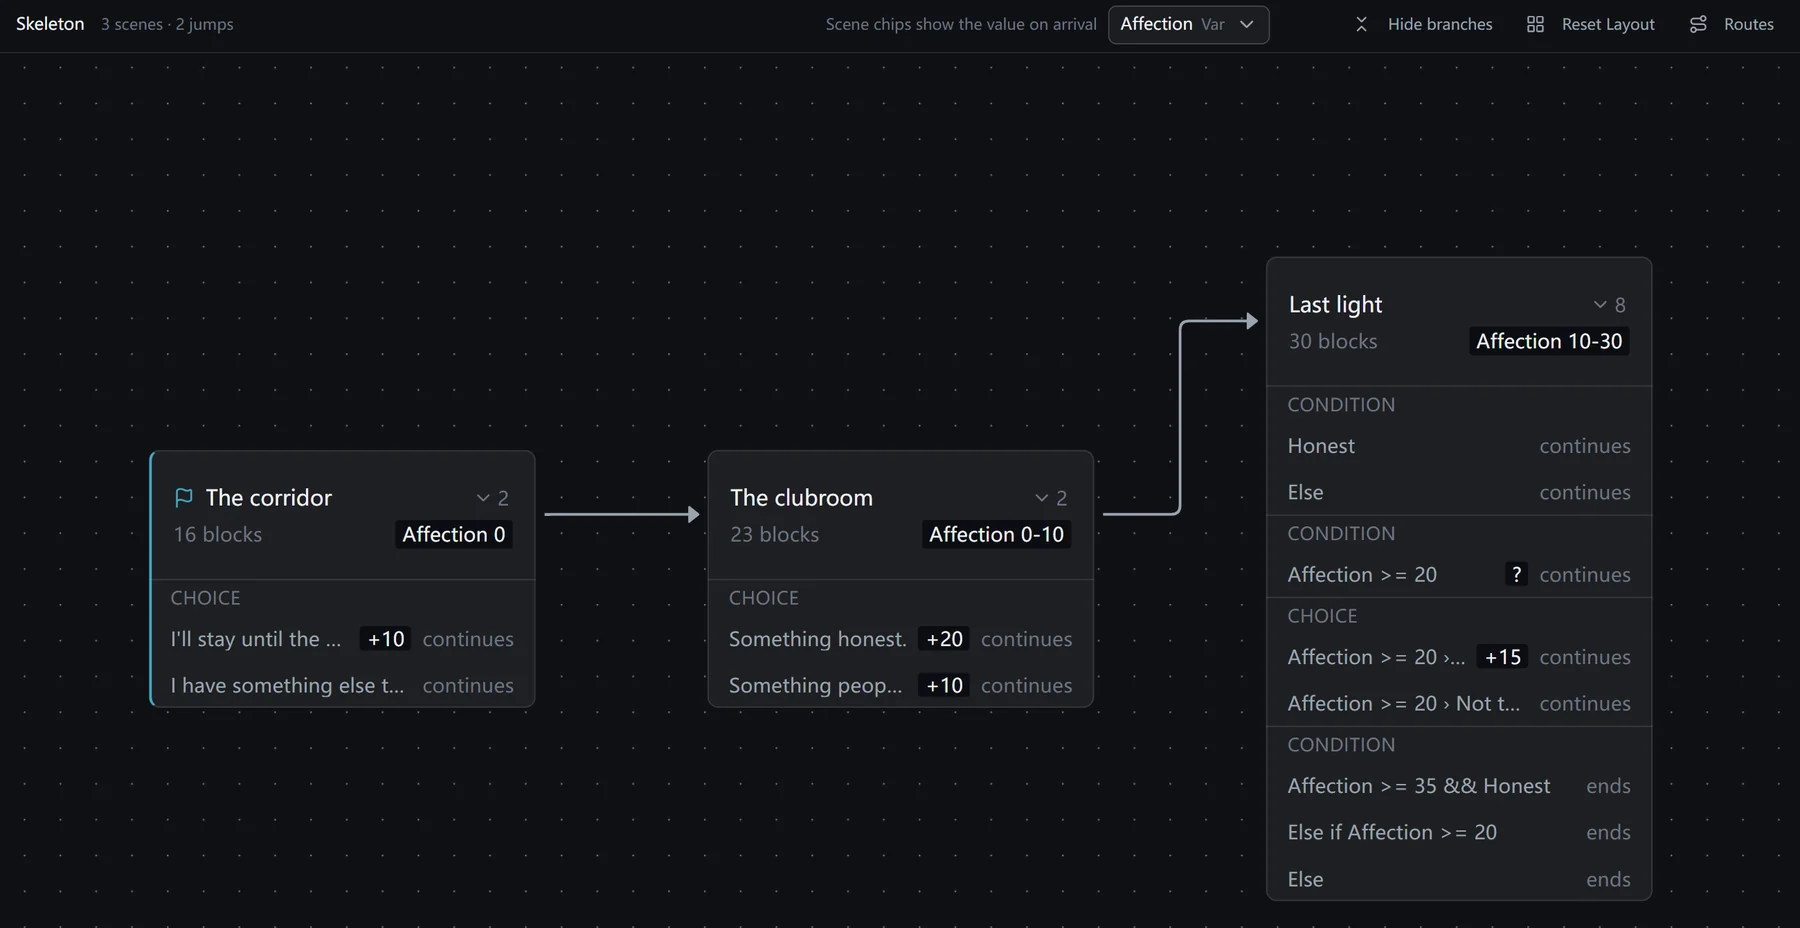
Endings reached 0 / 3. - Click Open Scene Flow in the Story panel and choose
Affectionin the variable list. Each scene shows the range ofAffectionon arrival; Show branches shows how much each option adds and which branches end the story. - When the threshold of a condition is higher than any route can reach, the Problems panel reports Condition no path can satisfy and gives the range of
Affectionat that point.
Related pages
- Persistent variables are not stored in saves and are kept across all saves and launches; see Persistent variables.
- Node reference: Variables nodes, Game nodes, Data nodes.